We will configure SQL Server AlwaysOn High Availability
Group for two nodes step by step. Once nodes are added to the cluster group, we
will be able to use the SQL server's AlwaysOn feature.
·
Create a Domain on Domain
controller
· Add Node 1 and Node 2 Servers that domain
· Login both Node 1 and Node Servers under same domain.
· Install SQL on Both Node 1 and Node 1 and make sure Log On Account should be in domain that we created on Domain Controller.
Above three task will perform by Server team, You need to make
sure Node 1 and Node 2 logged in same domain with Administrator account.
To enable AlwaysOn feature, Open SQL Server Configuration
Manager, Right-click SQL Server instance and go to properties,
Select AlwaysOn
High Availability tab section and tick checkbox for Enable AlwaysOn
AvailabilityGroups
Note: – We also need to make sure
nodes where we will enable AlwaysOn feature is part of Windows Failover
Cluster.

Once we enabled, Apply and Click OK. Restart the
SQL Server services.
As shown in the following fig. we will able to use
SQL Server AlwaysOn High Availability feature. Right-click Availability Groups and
Click New
Availability Group.
Configuring Availability Group
An AlwaysOn Availability Group contains a set of
user databases; we need to select user databases which will be part of the
Availability group. These databases called as an Availability database.

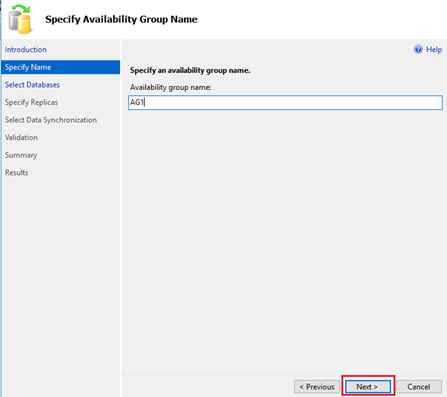
Specify Availability Group name and click Next
As shown in fig. we will use database STUDENT. To
proceed further, we need to perform one essential pre-requisite step, a Full
backup of the database. So, take a Full backup of STUDENT and click Next

Next, Specify Replica step has four sections. Replica, Endpoint, Backup
Preferences, and Listener
Replica– Replica is a server.
There are one primary replica and multiple replicas. In SQL server 2012, It
supports up to 4 secondary replicas, while in SQL Server 2014, it supports up
to 8 replicas.
The primary replica is primary source server or
production server. A secondary replica is a server which maintain a backup copy
of the primary server availability database. On the Primary replica, it allows
to perform Read and write operations while on the secondary replica only read
operations.
In this case, SQL1 is our primary replica and SQL2
is a secondary replica. So, we will add SQL2 as a secondary replica as shown in
the following fig.
Initial Role – It specifies the
role of replica whether Primary or secondary.
Automatic Failover –
It failovers functional role from primary replica to secondary replica by an
automated method with no data loss.
Synchronous Commit – In
the Synchronous-commit mode, failover can happen by either Automatic or manual
way with no data loss. So, in this case, we will use synchronous
commit with automatic failover.

Once clicked Add Replica,
connect to the server, Select SQL2 and Connect

Once we add secondary server SQL2 as a secondary
replica, the primary role of SQL2 is secondary.

In the Endpoint section, it will show configured
endpoint URL, port, endpoint name, and the service account name for SQL1 and
SQL2 nodes.

Backup Preferences – Backup
preferences indicate the backup location of the availability group. It
provides four backup options.
- Prefer Secondary –
Automatic backup will occur on a secondary replica
- Secondary only –
Automatic backup must occur on a secondary replica
- Primary –
Automatic backup must occur on a primary replica
- Any Replica –
Backup will occur on any replica
On the secondary replica, we can only take a log
backup, and Copy-only backup, Differential, and Full back up are not allowed on
a secondary replica. While on the primary replica, we can perform Full, log,
and Differential backups.

Listener– Listener is a
server through which nodes get to communicate with each other. The Listener has
all information about availability group. We need to select Create an Availability group
listener option and specify Name, Port and static IP as
shown in the following fig.

In Data Synchronization step, Select Full where
it performs Full and Log backup and puts it into shared location path.
Create a Shared location
Connect to node SQL1 and choose desired drive
location and folder, Right-click folder and Go to Properties, Select Security and
click Share.
It will show a pop-up window to add a user to whom, share permission need to
grant.
Provide the service account name and Click Add; it will
show pop-up window to check names, once service account name found in the
domain name, click Share.


In the Validation step, SQL Server performs validations against any required actions, and It will provide warning or error messages for missing required steps.

It performed all validation steps successfully, and wizard operation completed as shown in the following fig.

After successful completion, we will verify the database at secondary replica SQL2. As we can observe, Database STUDENT is in Synchronizing state, and it is in sync with the primary replica, and we can read data successfully.
0 Comments