Step By Step Installation Of Microsoft SQL Server On Windows
You must first download the program from Microsoft.
You’ll see something like the screenshot below. Look for the Express version.

Found it? Click Download now, wait a moment, and then run the installation file SQL2019-SSEI-Expr.exe. The installation wizard will appear:

Select Custom if you want to choose which components to install; a lot of people use this option. As you see below, you’ll need to specify the target location for the media download. If you want to change the default path, click the Browse button. Make sure you have enough disk space.

Click the Install button to download SQL Server 2019 Express’ installation packages:

Once the download is complete, you’ll get a message that everything was successful and that the installation is about to start.

Soon, you’ll see the Installation Center window. Choose New SQL Server stand-alone installation.

You must accept the license terms to use this producy, so check the button I accept the license and click the Next.

The installation process will start by identifying any problems and seeing if there are any existing files to update:


If you only see warnings about the Windows firewall, you’re good to go. Click the Next button.

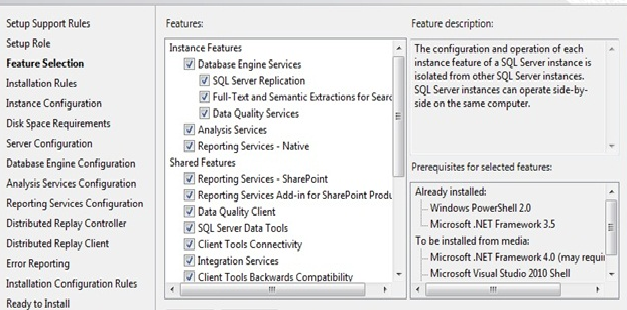
Now you can configure the server instance. I’ll leave it with the default settings.


Next, the setup wizard will install Java. It’s required for SQL Server to run:
When that’s done, the server configuration will appear. Click the Next button if everything looks good:

In Database Engine Configuration, you can change the authentication mode to Mixed. This will allow you to log into the server using either Windows authentication or a SQL Server sa (standard account) and a password which you choose:

Before clicking next, review the Data directories tab:
· Keep database files, logs, backups, etc in a other drives not in root directory for perfromance improvement.

On the next tab, configure the tempdb
files:
According to Microsoft Support, the best approach is to create one
tempdb data file per logical processor up to 8 data files.
If your system has
more than 8 logical processors, start with 8 data files and monitor your
server’s workload to determine if more data files would be beneficial. If
you do find that an increase is warranted, add 4 data files at a time, but do
not add more than the number of logical processors.

On the next tab, configure the MaxDOP files:
For many servers with 16 or fewer
virtual processor cores, the default is the same as the number of the cores,
effectively the same as MaxDOP setting = 0, which allows for unlimited
parallelism.
For example, with 8 logical
processors, SQL Server Setup will default the installation to use MaxDOP 8, as
pictured shown in below. With over 16 logical processors, SQL Server Setup may
default to half the number of logical processors—at most 16. For example, with
20 logical processors, SQL Server Setup will default the installation to use
MaxDOP 10.

On the next tab, configure the Memory files:
· Recommended to dedicate 80% of the whole server RAM to your SQL Server.
· I will leave the default values (min 0 and max 2147483647 MB).

and Now Click Next to Start the Installation

When the installation process is complete, click Close.

Congratulations! You’ve just installed SQL Server 2019 on your computer. You can start writing your first queries using the IDE of your choice, an appropriate text editor, or the command line. If you want to use PostgreSQL too, no problem. Learn how to install PostgreSQL on Windows 10 in 5 minutes.
How to Install Microsoft SQL Server Management Studio
To work even more effectively with MS SQL Server, I recommend that you use Microsoft SQL Server Management Studio (SSMS) or a similar tool. SSMS is used by many professionals around the world, and it’s available for free.
I already showed you how to install the database; now I will guide you through installing this great editor.
To do this, you must go back to the SQL Server Installation Center. This is where you chose the new stand-alone database installation.

Now choose Install SQL Server Management Tools. You will be taken to Microsoft's website, where you’ll find and download the latest version of Management Studio.

Run the downloaded SSMS-Setup-ENU.exe file and the installation process will begin. Click the Install button to start. (You can change the installation path by choosing another folder.)

The packages will be loaded.

In the last step, you will be asked to restart your computer.

Go ahead and restart your PC. In the Start menu (assuming you’re using Windows OS), you’ll see Microsoft SQL Server 2019, which contains Microsoft SQL Server Management Studio. Click on it to start using this application.

Now you will have to connect to SQL Server. Choose SQL Server Authentication from the Authentication drop-down menu and make sure the server type and name options are correct:

Write sa in the Login field and the server password that you used when installing the database. You can check Remember password if you don’t want to keep repeating this step each time you log in. Click Connect.

The editor is ready to manage the server and databases:

Now you are ready to write your first SQL scripts.
0 Comments